Wednesday, November 28, 2007

New 2008 Vehicross.info calendar available

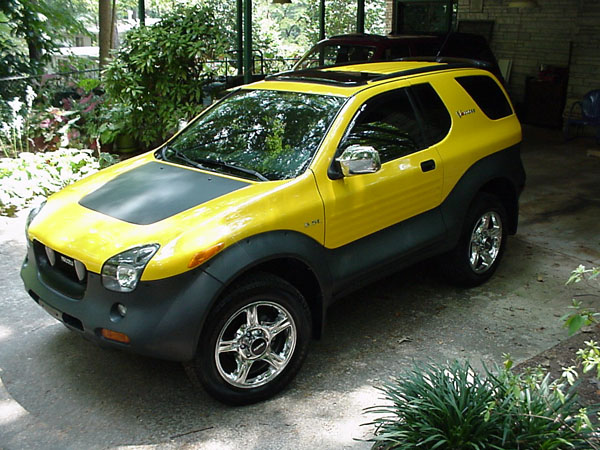
If you're into the VX like I am, you'd be thrilled to get this calendar:


All photos were taken and contributed by vehicross.info members.


-- Best, John

Monday, October 22, 2007

Supercharger Cold Air Intake (CAI)


I've finally got the Intake on my recently supercharged VX worked out and it's time to show some images. I met with Joe Black and friend Doug who were visiting from Florida (they picked up the Ebony that's being transformed into a Rally dedicated VX) up at John Schellenberg's place. After situating mods/fixes to the trailer, helping to load the VX and picking up a motor at a local shop (John's project), we got to work on the intake. The project involved removing the temporary setup (using parts from the Alpine SC kit and a K&N cone that I already had) and installing a setup that worked with the Green shielded filter that Tone sells. What is interesting about this filter is that there's an inlet flange that allows for tubing to be extended outside the engine compartment - see the bottom photo and you'll see how it was done. I used the rubber flange from the cone-filter to mate up to the fender hole - nearly a perfect fit for a 90 degree elbow coupled onto the front of the filter shield. The rest is pretty much a straight shot to the MAF, short 3 inch diameter tube and to the TB using couplings. A hole had to be drilled for the sensor and a short breather tube/filter attached to the valve cover (Note the small Green filter - the elbow came from a SS TB tube that John had laying around - probably Nissan).

In all a very clean install. I still need to swap out all the mismatched couplers and will probably upgrade the clamps - plus I need something better to support the weight of the thing - will probably fab up a bracket like I did for the former setup. I also need to cover the extended sensor wiring with loom. The quality and amount of air is noticeably different plus the engine temps, which were slight hot (right of center) are now back to slightly cold (left of center). Feeling the tubes before and after the intake there's a HUGE difference in temps, so I'm very happy.


I'll update with additional images as I finally get the couplers and bracket completed.

-- John

Monday, September 10, 2007

Supercharged for a Month

Supercharger is running fine but still have some work to do, mainly with the intake (it's making a squinchy sound when throttle is applied, plus I got a new Green filter with shield to mount up). The SC is an Eaton m62 on an Alpine kit. The only other issue is a gravelly sound when at negative vacuum (like coming to a stop) - might be the bearing in the nose - I got one of the old kits from back when it came supplied with a cast nose for the pulley - newer kits came with a CNC billet nose - I'm probably going to replace it. After I get the intake worked out it's going to get dynoed - and eventually the 4lb pulley (supplied with the kit) will get replaced with a 5 lb one - should improve throttle response even more with the extra boost.

I also recently had some issues (unrelated to the SC install) with the speed sensors on the TOD unit. On 8/26 I was travelling up to Athens GA pulling an unloaded trailer when the TOD warning light starting flashing. I then noticed that the front was making noises during turns. I suspected that the front drive was disabled and it was causing load on the CV joints and that's the sound I kept hearing. The VX otherwise seemed to be unaffected, only noisy in the front, flashing TOD warning light and crappy handling - which would make sense since the front wasn't powered.

When I stopped and turn off the ignition, the flashing light went away, only to return when the VX was back up to speed. I looked in the VX Shop Manuals but they rely on pulling a code through the Isuzu proprietary OBD-II Scangauge which I don't have - my generic scanner didn't show any codes. I went ahead and drained/refilled the TOD case and made sure there was gear-oil in the front differential (recently changed that). I didn't see any obvious damage to boots, ect in the front end and no smoking or grinding (other than when making tight turns, which I would expect with the FWD off).

So I thought the possibilities were as follows:

  1. Problem with the TOD unit - I felt around to make sure the connectors were engaged and the speed sensors and TOD links all looked good - I crawled under her and tugged on these to make sure the connection was good.
  2. Problem with the TOD ECU - since the TOD lights seem to be working correctly, it would have to be a very specific hardware issue within it's circuitry to have gone bad - not very likely.
  3. Issue with some front driveline component - could have been something fubar in the front-end that's not obvious and it's causing the front driveline to pass back some error condition - I'm thinking that this could be very probable and would be the worse case scenario.
  4. The other possibility that Joe Black pointed out while on the phone is that the ECU could be storing some error condition that isn't clearing - I did a full battery disconnect to see if that is so and if it might clear it up (this could be linked to the extra drag from the trailer - you're really not supposed to pull something at 85 MPH I guess, and coming to a stop might have put some stress on the TOD - just a possibility). Unfortunately the flashing light returned.

After exhausting the possibilities, time to take it to the dealer. The only Isuzu service center I know about is in BFE from my house and it would be a bear to get to in traffic tomorrow (that's Pugmire in Marietta for you Jawjan's). After leaving it there for a day they called me to say the TOD speed sensors were shot - they want $1100 to replace both speed sensors (parts are over to $300 each plus 4 hours labor). Sounded like a load of BS to me - lot to pay for labor that, once I reviewed the cd manual, looked easy (1 bolt on each sensor) - so far I was only out the $95 for the diagnostic.

Since no one stocks the sensors and I really shouldn't be driving the VX while it's mucked up, it was better logistically to buy and replace them both. $612 for the pair from Merlin and they were supposed to be at my house on Friday. In the meanwhile I rented a little econobox to drive around from Enterprise for $235 for the week (figuring I'll be saving on at least 2 fill-ups it's technically only costing me about a hunert bucks to drive around). I had to have the car as I was heading up to TN to visit the family that weekend (Labor Day). Even with the rental it cost me less than the dealer's $361 each for the sensors plus labor (and I would need the rental anyway).

FYI the sensors are mounted above and below the TOD unit and it didn't look like there's much in the way to replacing them. I was just hoping that that's the only thing wrong and it wasn't symptomatic of another problem. That was my fatal error - thinking it would be easy.

Peeled off the whole front of the VX to look for shorts in the harness - there weren't any so got busy looking at the wiring to the sensors - got the sensors during the week (supposed to be here 2 Fridays ago but they messed up and sent them to my old work address). Dismantling the existing harness was quite a PITA - there are plastic tabs that a bolt runs through into the TOD unit - each sensor has a round plug with a blue o-ring that's quite difficult to remove - have to gently pry all around until it loosens - I ended up breaking one tab from my existing bottom sensor (top came out first with no issue). You also need to disengage a tranny sensor that's also part of the harness. Once the harness is loosened up, you have to disengage the main connector on top of the unit - this was quite difficult as you can hardly thread one arm up there to grab it and the connector has to be mashed down for it to release - quite a bit of frustration there.

The connector can then be slid down the passenger side of the TOD by loosening the bolt holding the gas lines to the top of the case (you can then lift the lines and shimmy the connector under them). Once apart, all plastic wire casing has to be removed and the two sensors have to be unpinned from the connector (note that there are two wires who's ends are buried in the tranny that are still attached to the connector, so you're basically laying under the truck the whole time). I unpinned by removing the back and sliding a small screwdriver into the pin slots while wiggling the wire from the back.

The two new sensors are attached in a reverse of the above - lubing the o-ring with silicon helps but it's still a PITA getting them back in. Pinning into the connector isn't as bad as depinning. Once it's back together, electrical tape pulls the casing back on, making sure to reinstall the two wires you had to pull out for slack (the ones mentioned above that terminate in the tranny). Getting the main connector back together wasn't easy. Once you get the "click" you can bolt the connector back to the top of the case, bolt the gas lines back, reconnect the sensors and the 3rd sensor on the tranny (this one gets a zip tie too to help hold the wire out of the way). When it was back together I reconnected the battery (left out that it needs to be disabled while you work on this, as with any electrical system), got in and started her up. Started on the first try.

Drove her down the road and noticed a new, high pitched whine - this lasted until I go back to the house and backed in. Next startup and the whine wasn't there - all this so far was about 5 hours dismantling last weekend and about 4 hours putting her back together on Saturday. This morning I got in her and once again noticed the whine, but much fainter - driving a few miles the whine went away completely - I'm not sure what it was and hope it's not something that will come back to haunt me later.

Last week, when I realized the parts wouldn't make it I had an offer from Joe Black to use the sensors off his ebony up at John Schellenberg's - he was nice enough to remove the piece of harness from Joe's and drop it off last Sunday morning (took him an hour to do this - dunno why it took me 5 to do the same thing! - difference in skill level I guess). After spending so much time fumbling with removing mine I didn't have it in me to finish (it was getting dark) so I figured I would just wait for the parts. Now I still have to put Joe's back in his ebony, but that can wait until next weekend.

Good news is that the flashing TOD light has gone away and she's driving great - guess that's what is most important. Note that I used the CD manual as a reference and it looked easy from that perspective - but this was anything but easy to do. If I had known it would be this hard I would have just paid the money and had the dealer's service group do it. I'll think twice next time.

-- John

Monday, August 6, 2007

#580 is now SUPERCHARGED!

OK - it's official - my proton is now Supercharged!

I was part of the original 10 who bought the Alpine kit from Tone Monday off the old ClubVMag forum - it's been sitting in the box in my basement until recently. I just never had the time for the install. I finally had some time this weekend and took the opportunity to head up to John Schellenberg's place on Saturday to begin the install - the timing was good for us both since school doesn't start for him until today. It took all day Saturday and most of Sunday to get everything right.

Some notes and suggestions on the install:

  1. Prior Engine Bay Cleaning - I suggest to anyone thinking of installing the SC to clean the engine bay well - There was a lot of sand and debris that we had to remove from surfaces - especially the cylinder heads, once the old Intake Manifold was removed. We wiped out the gunk in the ports using rags soaked in brake cleaner, the vacuumed out the debris using a tiny vacuum attachment bought at Lowes. Then did more wiping until it was spotless. It's amazing how dirty the original manifold was - literally caked in greasy gunk.
  2. Photos and Labeling - take photos of everything before you take a piece off the motor - then label every connector and hose before moving aside. We missed a couple and spent a lot of head-scratching time figuring things out.
  3. Poor directions - as stated before the Alpine directions are a joke. They don't even approximate what's needed for this install. The most useful document for us was the vacuum hose diagram that came from the Supercharger 101 thread. The next SC John installs I plan to take step-by-step photos and detail everything. There were a lot of questions about how the parts fit together - also things could have been a lot smoother if the assembly order was changed a bit.
  4. Fuel Injectors and "0" Rings - Everything went together smoothly - if you use some silicon spray (apply to finger then to the "O" ring), everything pops right in - the only issue we had was that one didn't seat right and you can't tell until the system is pressurized - fixing the issue required dissembly - and once the "O" rings get fuel on them they swell - this was a real PITA and took probably the most time out of the whole install.
  5. ECU Codes - I came prepared with a OBD II meter to clear codes - remarkably we didn't have a single engine code. I think this can be attributed to hooking up all the electronics and vacuum lines before turning over the ignition. We did have one puzzling problem with the Fuel Pump relay - it would rapidly click and flash the interior trouble lights - we figured out that it was the engine ground - we had it in a valve cover bolt (the valve covers must either be made of a non-conductive alloy or the coating prevents metal contact) - moving the grounds to the fuel rail (something we really didn't want to do), corrected the issue.
  6. Cruise Control Bracket and Cable - I found a cable and "bracket" in the box and forgotten than they were sent to me early on - the elongated cable would work, but the bracket sent to me was a joke - it's the same as the throttle bracket only bent in and I'm guessing designed to fit on the end of the throttle bracket supplied with the SC - if that's what's shipping now I may just design something else to as one piece for them both. As it is, the supplied throttle bracket had to be straighted quite a bit, and the angle altered to work.
  7. Extra Parts - something you never want on an assembly like this are inexplicable parts - there were several "weird" parts that presumably were for a Trooper install (one 2" air duct extension looks like it's supposed to be added to the bottom of the OEM air filter canister - seen from one of the Alpine photos). I'm guessing that the kit I have is basically a Trooper kit with different instructions - it also came with a square-faced throttle body adapter and other bits and pieces that weren't used. It would be good to compile a list with pictures of what is used and not - same goes for the vacuum tubing instructions - the diagram helped but some things aren't used (the evap canister for instance) and it's not exactly obvious. It took a bit of research on all the SC threads on the info site to figure things out.


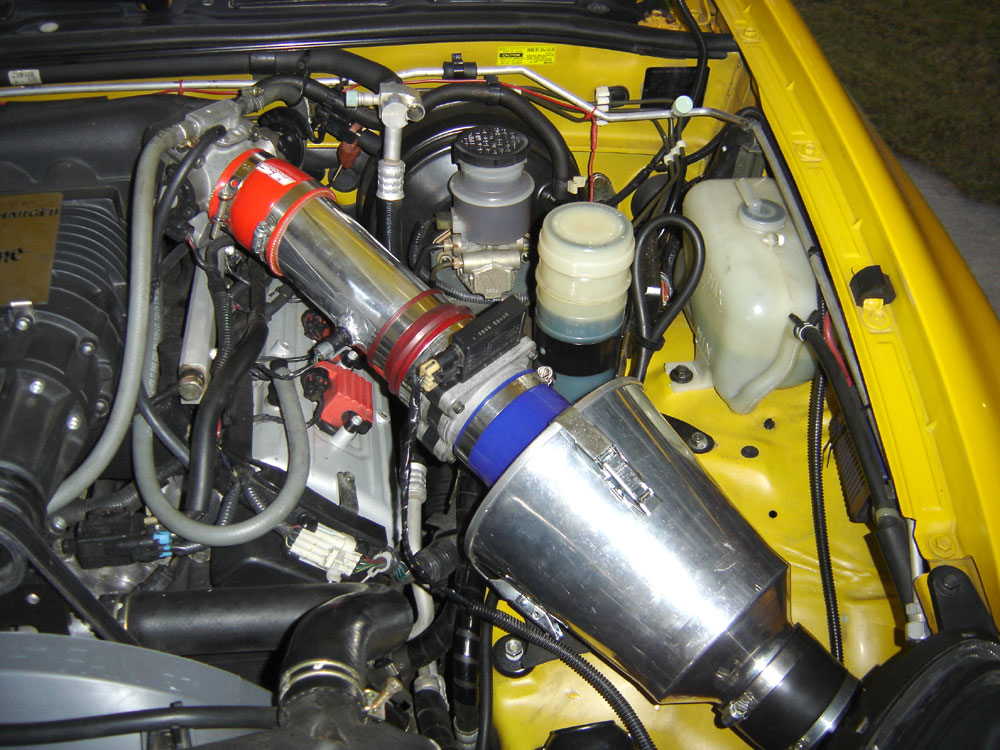
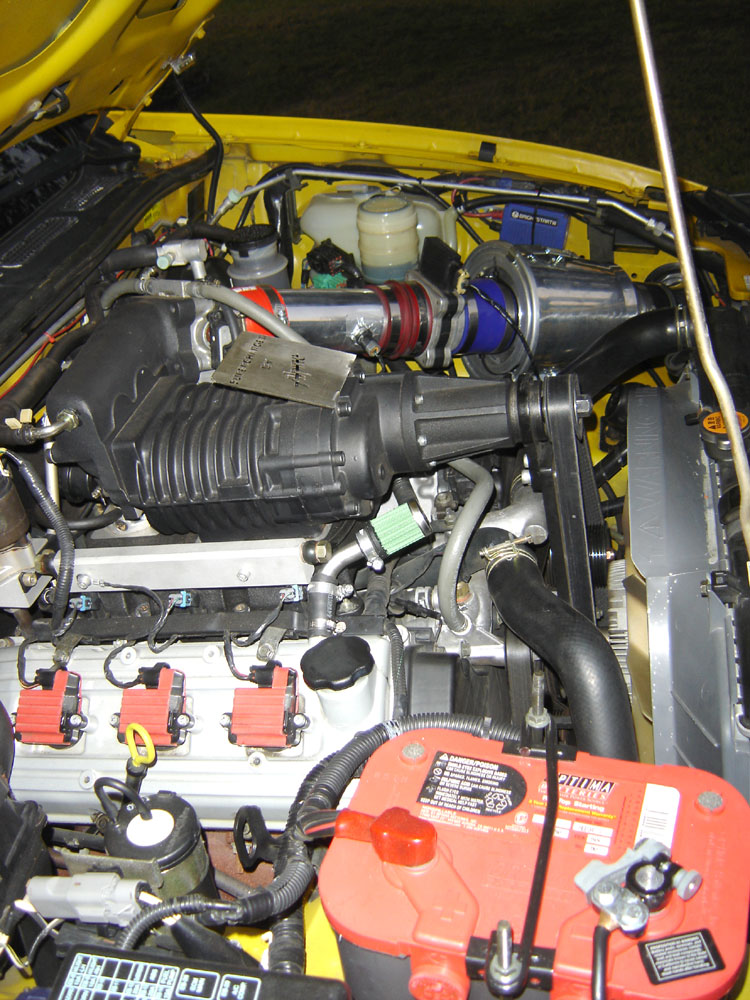
Impressions? It's really amazing the amount of throttle response and torque I'm now getting - even with the AC blasting full force. Passing is a breeze and now effortless, even at speed. I'm very pleased. I decided to put the stock kit on but will eventually go with the 5 lb. pulley and machined aluminum nose - I want to get some dyno numbers before doing so (I had went with Dave Sirkin 2 years ago and got dyno numbers of the nearly stock Proton - I want to see what the improvement of the basic kit is to nearly stock, then with the smaller pulley).

I've still got to work out the intake (doing a hybrid of the supplied piping and a cone filter) and create a cold air box - once I have those and dress up the bay a bit I'll post some pics. John's already looking at the possibility of making some real headers for it - I'm not sure if there's enough tube length, but opening up the overall size to the tail pipe should help out a lot (there's a restrictive part in there that reduces the exhaust to about 1.5 inches in the OEM config).


-- John

Monday, July 16, 2007

90K and still going strong

I hit 90K this past weekend and decided it was time to give a little update. The truck is running strong with very little besides maintenance to be done on it:

  1. Left-rear 1157 bulb burnt out at about 50K
  2. Replaced the tires at 39K miles (Pirelli V-rated Scorpions 255 55H18)
  3. Replaced the factory battery with a 600 A Red Top Optima (bought at Costco) - the old battery was dying - at 45K miles.
  4. Right Window stared slipping about 60K - did the washer fix and it's been working fine.
  5. Upgraded the rotors at about 72K (didn't need to but went with some cross-drilled) - still plenty of pad left so I'm still on them (bought new but didn't want to waste what was still good). Also went with new braided lines all around.
  6. ABS unit went bad and was replaced with a unit pulled from a 99 VX (total cost $100 plus install) at about 72K miles (same time as the brake lines and rotors).
  7. The 600 A Optima I had died after 2 years (75K miles) - got a refund on it at Costco and bought a 700 A Optima red top at Sears - it's still going strong.
  8. Replaced the tires with Kumho Ecstas at about 79K (started getting wear on the Pirellis - a bit too soft and grippy for me - the Pirellis would track into every groove on the road - the Kumho's are slightly harder and don't track).
  9. Right-rear 1157 bulb burnt out at 89K (good thing they are sold in pairs!).
  10. About to get the 90K maintenance done

I change the oil about every 4-5K - useing 10w30 Mobile 1 and put in about 1 qt between oil changes. I also change the PCV every-other oil change - I find that it improves the mileage slight. I also changed to 89 octane as I was getting some pre-ignition using 87. About once every 2 months or so I put in some additive to melt out the impurities. That's about it - the truck has been running flawlessly.

-- John

Wednesday, June 6, 2007

About me and more importantly, my truck


I figured I needed to add a little background on my VehiCROSS experience and about the truck itself. I have an homage site setup that has most of the details located at http://www.wildtoys.com/vehicross/.

I describe on my site how I first found the VX and what an impact it had on me. You can also use my homage site to view images of magazine article scans and gather stats on the VX along with development history and production information.

More info to follow...

-- John

Monday, May 14, 2007

Welcome

Welcome to my Isuzu VehiCROSS blog. For more information about the VehiCROSS, you can access my post on Wikipedia: http://en.wikipedia.org/wiki/Vehicross

-- John